


Vintage Buttercream Cake: the Piping Has a Name, and the Original Wasn’t Buttercream
Description
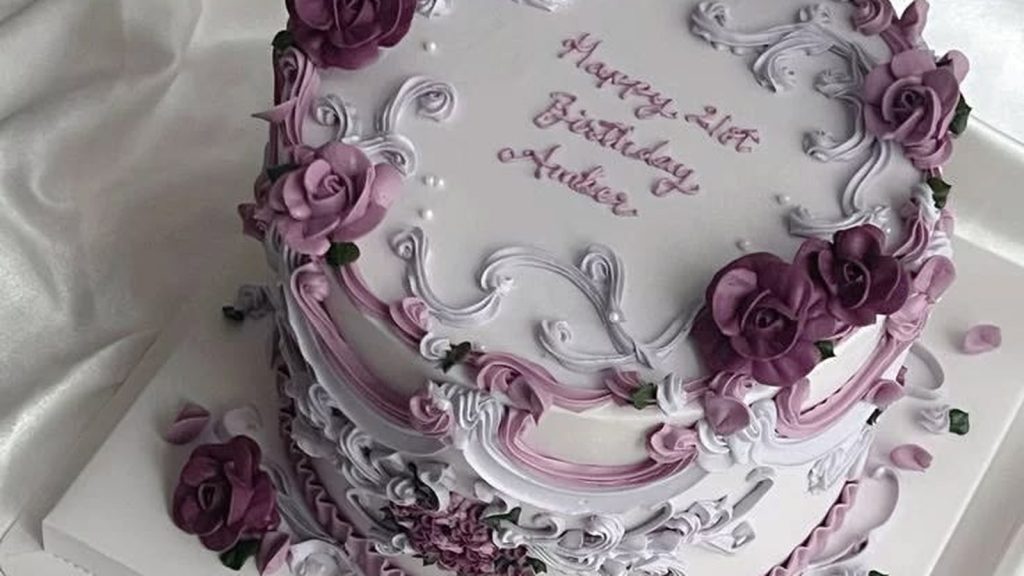
A single-tier vanilla layer cake under smooth ivory buttercream, worked in rounds: shell borders, pink and white swags over vertical ruffles, pearls, scrollwork with a second finer line piped along the top of it, and deep plum roses spilling over the top edge. The method has a proper name — English over-piping — and it was built for royal icing, which sets hard. Buttercream never sets, so the refrigerator does that job instead: about 20 minutes between rounds.
Ingredients
For the vanilla layers
For the American buttercream (butter icing)
For the colors
Instructions
Bake the two layers
-
Heat the oven and line the pans
Set a rack in the center and heat the oven to 175°C (350°F). Grease two 20 cm (8-inch) round cake pans (tins), 5 cm (2 inches) deep, and line the bases with parchment paper (baking parchment).
-
Rub the butter into the dry ingredients first
With the paddle on low, mix the 340 g (about 2 3/4 cups) cake flour, 320 g granulated sugar, 3 teaspoons baking powder and 3/4 teaspoon fine sea salt for 20 seconds. Add the 170 g (12 tablespoons) butter cubes a few at a time and keep mixing on low for 2 to 3 minutes, until the bowl looks like damp sand and no loose flour is left. Coating the flour in fat before any liquid arrives is what gives a tight, even crumb — and a tight crumb is what carries a kilo of frosting without compressing under it.
-
Add the liquids in two goes
Whisk the 240 ml (1 cup) buttermilk, 60 ml (4 tablespoons) oil, 3 eggs, 2 egg whites and 3 teaspoons vanilla together in a jug. Pour in half, beat on medium for 45 seconds, scrape the bowl down, then pour in the rest and beat for 30 seconds more. Stop there — more mixing buys you a domed top you will only have to cut off.
-
Bake, then cool completely
Divide the batter between the two pans by weight, about 690 g each, and level the tops. Bake at 175°C (350°F) for 30 to 35 minutes, until the centers spring back and a skewer comes out with a crumb or two clinging to it. Cool in the pans for 10 minutes, turn out, and leave them on a rack until completely cold, at least 1 hour. If you have the time, wrap the cold layers and refrigerate them: Liz Marek’s vintage cake tutorial at Sugar Geek Show says to freeze the cakes for an hour or refrigerate them wrapped overnight so they are firm enough to handle while frosting, and firm layers make a straighter side to pipe on.
Make the buttercream
-
Beat the butter, then the sugar
Beat the 454 g (2 cups) butter on medium for 3 minutes, until pale and smooth. Add the 810 g (6 3/4 cups) sifted confectioners’ sugar in four goes on low speed, then 45 ml (3 tablespoons) of the cream with the 3/4 teaspoon salt stirred into it, and the 2 teaspoons vanilla. Beat on medium for 2 minutes. Add the last tablespoon of cream only if the frosting is stiff enough to resist the bag.
-
Paddle the air out — 10 to 15 minutes
Drop the mixer to its lowest speed and let the paddle work the frosting for 10 to 15 minutes, scraping the bowl twice. This is dull and it is not optional: air bubbles blow holes in a swag and break a scroll mid-line, and on this cake every line is on show. An immersion (stick) blender does the same job faster. You should finish with about 1,335 g of buttercream.
Split it and color it
-
Weigh out five bowls
Weigh 620 g into one bowl for the filling and the two coats, 300 g into a second for the white piping, 265 g into a third, 125 g into a fourth and 25 g into a fifth. Cover the two white bowls; frosting left open forms a skin in about twenty minutes.
-
Tint four of them
Take the 265 g to a soft pink with the pink gel, the 125 g to a deep plum with the burgundy gel, and the 25 g to a muted green, adding color a drop at a time on a toothpick and beating it through before you judge the shade. Then scoop 20 g out of the 300 g white bowl and stir about 2 g (1/2 teaspoon) of the finished plum buttercream through it, a little at a time, until it reads dusty mauve: that is the writing color, the same family as the roses but let down to a whisper of it. The base coat stays exactly as it is: butter makes it ivory rather than white, and this recipe does not pretend otherwise.
Fill, coat and chill
-
Level and fill
Trim any dome off the two layers with a serrated knife. Set the first on a 20 cm (8-inch) board on a turntable, spread about 200 g of the plain buttercream over it right out to the edge, and top with the second layer, cut side down.
-
Crumb coat and chill
Spread a thin scrape of the plain buttercream over the whole cake, about 120 g — you should still see the cake through it — and chill for 20 minutes, until it is firm to a fingertip. That coat traps the crumbs so the finish coat stays clean, and a clean finish coat is the canvas for everything that follows.
-
Finish coat, then chill it hard
Spread the remaining 300 g of plain buttercream over the sides and top, then hold a bench scraper still against the side and turn the cake underneath it until the side is flat and square to the board. Now chill properly. British Girl Bakes is blunt about why: “When you do pipe onto the cake, you need the frosted cake to be firm. If the frosting is still soft, the pressure of your piping tip can damage the frosting” — and she puts it at “About an hour in the fridge is ideal but thirty minutes in the freezer will work instead.”
Pipe the borders and the swags
-
Mark the design before you pipe anything
Marek’s guide is the one worth copying: “Use a round cutter or piece of paper (space key) to mark equal spaces around the top 1/3 and bottom 1/3 of the cake. This will be the guide for the ruffles later. The space key should be about 3″ wide.” On a 20 cm (8-inch) cake the side runs about 64 cm (25 inches) around, so a 7.5 cm (3-inch) paper strip walks it in eight steps with about 3 cm to share out between them. Press the marks in lightly with a toothpick, and cut a paper circle the size of the top to sketch the scrollwork on before you commit.
-
Shell borders, then reverse shells on top of them
Fit a Wilton 1M to a bag of the plain white and pipe a shell border all the way around the base of the cake, then a second one around the top edge. Swap to a Wilton 18 open star and pipe a reverse shell along the top of the base border and along the underside of the top border. That second row sitting on the first is already over-piping, and it is the easiest place to learn what the pressure should feel like.
-
Swags, vertical ruffles, and a chill
Fit a Wilton 104 petal tip to a bag of the plain white and pipe a shallow arc between each pair of marks, wiggling your wrist as you go — hold the tip as British Girl Bakes describes, “vertically, with the narrow part of the teardrop shape pointing down”. Fit the same tip to the pink and lay a second, narrower arc along the lower edge of every white swag, so each drape reads as two ribbons rather than one. Under every point where two swags meet, turn the white tip round-side up and pipe a short run of vertical ruffles down toward the base. Finish with a ruffled band along the very bottom, sitting over the shell border. Then chill the cake for 20 minutes.
Finish the top, then let it warm up
-
Pearls and fleur-de-lis
With a Wilton 4 round tip and the plain white, pipe pearls along the top edge of the swags and in small groups of three across the top, close together but not squashed. Swap to a Wilton 16 star and pipe trios of shells — a fleur-de-lis — at each point where two swags meet, with a group of three small dots between them. Chill for 20 minutes.
-
Scrollwork, then the second line that names the method
Fit a Wilton 3 round tip to the plain white and pipe S and C scrolls across the top surface, working out from a clear oval in the middle where the message will go; add a few of the same scrolls in pink so the top echoes the side. Chill for 20 minutes, then come back with a Wilton 2 and run a finer line along the crown of every scroll you already piped. That line on top of a line is over-piping, and it is the difference between a decorated cake and a vintage one.
-
Roses, leaves, and the message
Fit a Wilton 104 to the plum, stick a 7.5 cm (3-inch) parchment square to a flower nail with a dab of frosting, and pipe roses: a cone first, then petals wrapped around it, turning the nail in your other hand while the bag stays still. Slide each square onto a tray and freeze the tray for 30 minutes, until the roses are solid. Peel them off and press them around the top edge so some sit on the top and some spill down over the side, larger ones first and smaller ones tucked into the gaps. Pipe small leaves into the gaps with a leaf tip (Wilton 352) and the green. Last of all, fit a Wilton 3 to the mauve and write your message across the clear middle — pipe it slightly above the surface and let the line fall into place rather than dragging the tip along the frosting.
-
Chill, then bring it back to room temperature
Refrigerate the finished cake until you need it. Take it out about 2 hours before serving — British Girl Bakes gives “about two hours for small cakes or four hours for large cakes” — because buttercream straight from the fridge eats like cold butter and the piping loses the softness that makes it look piped rather than molded. Cut with a long knife wiped clean between slices.
Nutrition Facts
Servings 12
Serving Size 1 of 12 slices
- Amount Per Serving
- Calories 934kcal
- % Daily Value *
- Total Fat 50g65%
- Saturated Fat 28g140%
- Trans Fat 2g
- Cholesterol 165mg56%
- Sodium 479mg21%
- Potassium 109mg3%
- Total Carbohydrate 118g43%
- Sugars 94g
- Protein 6g12%
- Vitamin A 387 mcg RAE
- Calcium 120 mg
- Iron 3 mg
* Percent Daily Values are based on a 2,000 calorie diet. Your daily value may be higher or lower depending on your calorie needs.
Note
- The style has a name, and the man it is named after did not invent it. The proper name is English over-piping: a piped line, left to set, with another line piped along the top of it. It is called the Lambeth method after Joseph A. Lambeth, who ran the Lambeth Decorating School in England and published The Lambeth Method of Cake Decoration & Practical Pastries. The year is less settled than it looks: Wikipedia’s article on Lambeth dates the book to 1934, while the catalogue record at Open Library gives a first publication year of 1937, so this recipe says “the 1930s” and leaves it there. What is not in dispute is that it is the twentieth century — which is why Betty Crocker’s own page on vintage cakes is wrong when it says the style “first originated in Europe in the 19th century by master cake decorator, Joseph Lambeth”. And he was not first. Decorator Kathleen Lange, who completed a 150-hour Lambeth Method master course, writes on her history of the technique that Lambeth “popularized English overpiping by add his own flair; he did not invent the method”, and the same page lists people publishing before him — Ernest Schulbe, a German working in Withington, Manchester, with books in 1898 and 1906; George Cox, book in 1903; Edwin Schur in Putney, London; and S.P. Borella, born in Italy in 1864 (that page gives two different years for Borella’s main book, so no year for him here). Food Republic’s Eli Cohen puts it the same way: over-piping “was being written about by European pastry chefs as early as the late 1800s”.
- The original was royal icing, and that is the entire reason this recipe keeps sending you to the fridge. Royal icing is, in Wikipedia’s words, “a hard white icing, made from softly beaten egg whites, icing sugar (powdered sugar), and sometimes lemon or lime juice”. It sets — and a set line holds itself up while you pipe the next line on top of it. Buttercream never sets; it firms when it is cold and softens again on the counter. Food Republic says the same from the modern end: “the traditional method calls for royal icing”, while “the modern variation tends to use buttercream, which stays softer after drying”, and buttercream “doesn’t capture extremely intricate details as well as royal icing”. So the refrigerator does the job the egg white used to do, and British Girl Bakes gives the number this recipe uses: chill the first detail and “it will set after about 20 minutes in the fridge so that it holds its shape even as you pipe on top of it”. Skip those three chills and the second line sinks into the first, the colors bleed together, and your tip knocks over what you piped ten minutes ago. Worth knowing before you start: Food Republic reckons piping in this style “can take up to five hours or even more”. That figure is for elaborate work and this design is simpler, but no version of this cake is a quick one.
- If you swap to real royal icing, the eggs become a food-safety question rather than a preference. Nothing in this recipe contains raw egg — the buttercream is butter and sugar, the layers are baked — so this only matters if you go traditional. The FDA is direct about it: “Fresh eggs, even those with clean, uncracked shells, may contain bacteria called Salmonella that can cause foodborne illness”, and for recipes where the egg is still raw when the dish is served, the agency says to “use either shell eggs that have been treated to destroy Salmonella, by pasteurization or another approved method, or pasteurized egg products”. It puts the usual onset of symptoms at 12 to 72 hours after infection and names the groups at higher risk. The straightforward workaround is in Wikipedia’s royal icing entry: meringue powder or ready-to-use pasteurized refrigerated egg whites “can be used with similar results”, and aquafaba covers an egg-free version. If you are piping for children, older guests or anyone pregnant, that is the version to make.
- The tips, and what each one is actually for. The set here follows Liz Marek’s vintage cake tutorial at Sugar Geek Show: a Wilton 1M for the shell border at base and top, a Wilton 18 open star for the reverse shells piped over them, a Wilton 104 petal tip for the ruffles (“The round part of the tip should be pointing up”), a Wilton 4 round for the pearl border, and a Wilton 16 star for the fleur-de-lis trios and the small dots. British Girl Bakes supplies the swag with the same 104 held “vertically, with the narrow part of the teardrop shape pointing down”, wiggling the wrist — the one tip doing two completely different jobs is the trick most worth learning here. A Wilton 3 writes and pipes the scrolls, a Wilton 2 lays the finer line over them, a leaf tip such as a Wilton 352 does the leaves, and the 104 pipes the roses on a flower nail. Couplers are worth the money on this cake: British Girl Bakes keeps one tip and swaps it between color bags rather than owning five of everything.
- Temperature is the whole craft, and it works against you in both directions. The cake wants to be cold and the frosting wants to be at room temperature, which means you are managing two different temperatures at once for several hours. A cold cake takes a clean line; a soft one takes a dent from the tip. Cold frosting tears at the edge of a petal; warm frosting slumps and a swag droops out of its arc. British Girl Bakes uses a buttercream that “gets firm when it’s cold but softens as it warm up”, which is exactly what the butter-and-sugar version in this recipe does. Two practical things follow. First, fill bags half full and keep the spares in the fridge, because the heat that ruins a swag is mostly coming out of your own hand. Second, if a line goes soft mid-piping, stop, put everything in the fridge for ten minutes, and come back — the temptation to push on is how a top ends up with two good scrolls and four slurred ones. If you would rather not use gel colors at all, the berry-syrup route is in our lilac buttercream flower cake; it is a gentler, paler palette and it loosens the frosting, which is a harder trade on a cake built out of piped lines than on one covered in flowers.
- How long it can sit out: we could not find an authority that answers this, and we are not going to invent one. It is one of the most-asked questions about buttercream cakes, the figures circulating on baking sites disagree with each other, and none we could find cites a food-safety regulator. The FDA guidance we did read covers eggs and egg dishes, not a frosting made of butter and sugar, so it does not transfer — and a recipe that borrows a number from the wrong document is worse than a recipe that says it does not know. What is settled is the other direction, and it comes from a decorator rather than a regulator. British Girl Bakes: vintage cakes “should be refrigerated to preserve the heavy piping”, then taken out “a few hours before serving… about two hours for small cakes or four hours for large cakes”. A 20 cm (8-inch) single tier is a small cake, so two hours. In practice the piping tells you what the room is doing long before anything else does: when the pearls start to lose their edges, the cake wants to go back in. The layers themselves can be baked, cooled, wrapped and held 2 days at cool room temperature or frozen for a month, and leftover buttercream keeps 5 days refrigerated and needs a good re-beat before it will pipe again.
- What a slice carries, and how the card was calculated. Start with arithmetic anyone can redo. 624 g of butter goes into this cake — 170 g in the layers and 454 g in the buttercream. USDA’s SR Legacy record for unsalted butter (FDC 173430) puts saturated fat at 50.5 g per 100 g, so the butter alone carries roughly 315 g of saturated fat, and a twelfth of that lands near 26 g. The card says 28 g, because it adds what the cream, the eggs, the oil and the buttermilk bring on top of the butter. For scale, the NHS says men should have no more than 30 g of saturated fat a day and women no more than 20 g, and lists “butter, ghee, and lard” and “biscuits, cakes, and pastries” among the foods high in it. There is nothing exotic behind that number: 21 U.S. Code § 321a, on the books since 1923, defines butter as “containing not less than 80 per centum by weight of milk fat”, and a vintage cake is a cake wearing more frosting than most. The sugar runs alongside it — 320 g granulated plus 810 g confectioners’, 1,130 g in all, about 94 g in a twelfth. Cut the same cake into 16 and a slice lands nearer 21 g of saturated fat and 70 g of sugar; the cake has not changed, only the knife. None of that is an argument against birthday cake. It is an argument for knowing the number instead of guessing it. The card figures come from USDA FoodData Central SR Legacy records for the raw ingredients — cake flour 169723, granulated sugar 169655, baking powder 172803, table salt 173468, unsalted butter 173430, canola oil 172336, egg 171287, egg white 172183, buttermilk 170874, vanilla extract 173471, confectioners’ sugar 169656, heavy cream 170859 — added up for the whole cake and divided by 12. USDA’s Table of Nutrient Retention Factors (Release 6) has no row for baked goods, so the nearest documented row, flour/meal, baked (retention code 0301), was applied to the batter: all eight minerals hold at 100 %, vitamin C at 80 % and vitamin A at 90 %. The buttercream is never heated and gets no factor at all. Nothing here is boiled and drained, so nothing leaches — the salt in the recipe is counted in full, both spoonfuls of it. The gel colors are used in fractions of a teaspoon across the whole cake and are not counted. One number the records cannot give on their own: the USDA record for unsalted butter carries no entry for trans fat, so the card’s figure comes from USDA’s sister record for salted butter (173410, 3.278 g per 100 g) — that is the trans fat that occurs naturally in dairy, not the hydrogenated kind. And about a tenth of the buttercream never reaches the cake: it stays in the bags, on the flower nail and on the spare roses, so a real slice runs a little under what the card says rather than over.